How to Combine Multiple Images into One Collage or Grid
You have 6 product photos that need to become one Instagram carousel preview. Or 4 screenshots for a documentation tutorial. Maybe 9 team photos for a company about page. You need them combined into a single image-grid layout, consistent spacing, professional appearance.
Your options? Photoshop (expensive, complex for simple grids), Canva (freemium, requires account), or online collage makers (watermarks, limited layouts, upload your images to their servers). For a simple grid, you're jumping through hoops.
The Image Combining Problem
Creating image grids and collages is a common need:
- Social media: Instagram grids, before/after comparisons, product showcases
- Documentation: Tutorial screenshots in sequence, step-by-step guides
- E-commerce: Product variants in one image, color options display
- Marketing: Team photos, portfolio grids, event highlights
- Personal: Photo strips, memory collages, comparison shots
But the tools are either:
- Overkill: Photoshop with layers, masks, alignment tools for a simple 2×2 grid
- Restricted: Canva's free tier limits exports, adds branding
- Privacy-risky: Online tools upload your images to process
- Limited: Mobile apps with forced templates, no customization
You want drag, drop, arrange, export. Simple. Fast. Private.
The Solution: Browser-Based Image Combiner
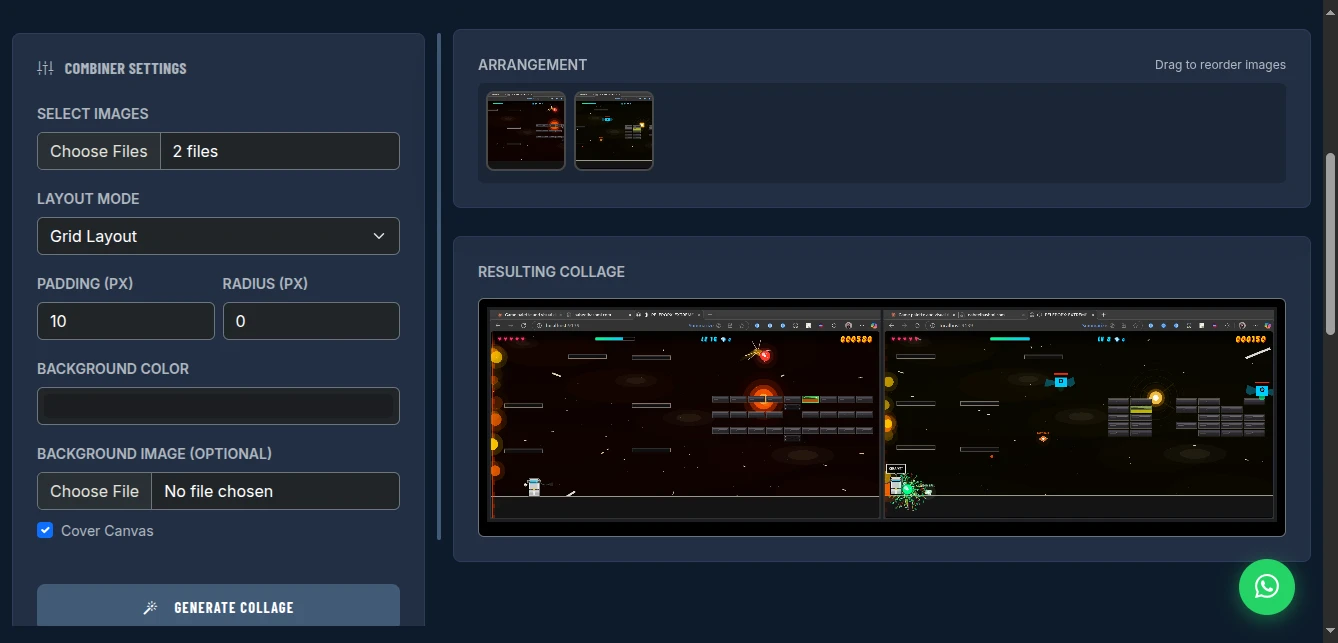
The Image Combiner creates professional grids and strips from your images instantly. Upload multiple photos, drag to reorder, choose layout mode, adjust padding and background, and export as a single composite image. All processing happens locally-no uploads, no watermarks, complete privacy.
Why This Approach Wins
True Privacy: Your images never leave your device. Process family photos, product shots, or screenshots with complete security. We literally cannot see your images.
Flexible Layouts: Grid layouts (2×2, 3×3, etc.) or horizontal/vertical strips. Automatic arrangement or manual control.
Visual Control: Custom padding between images, rounded corners, background colors or images. Match your brand or aesthetic.
Drag Reordering: Visual arrangement panel-drag thumbnails to change order instantly. See exactly how the final composition will look.
Zero Cost: No "upgrade for HD export." No "Pro version for more images." Completely free.
High Resolution: Output resolution limited only by browser canvas capabilities. Modern browsers handle very large composites.
Layout Modes Explained
Grid Layout
Arranges images in rows and columns:
- 2×2: 4 images in square grid
- 3×3: 9 images in square grid
- Auto-grid: Tool calculates optimal rows/columns based on image count
Best for: Instagram posts, product showcases, team photos, portfolio grids
Horizontal Strip
Single row of images side-by-side:
Best for: Before/after comparisons, timeline sequences, panorama-style compositions, documentation steps
Vertical Strip
Single column of images stacked:
Best for: Pinterest-style layouts, story sequences, mobile screenshots, tall compositions
Masonry (if available)
Pinterest-style uneven grid where images fit by height:
Best for: Photo galleries, mixed aspect ratios, artistic collages
Key Features for Perfect Composites
Visual Customization
- Padding: Space between images (0px for seamless, 10-20px for breathing room)
- Radius: Rounded corners on individual images (0px for sharp, 10-20px for modern)
- Background Color: Solid color behind the grid (transparent PNG option for flexible use)
- Background Image: Upload custom background (branded backdrop, texture)
- Cover Canvas: Background image fills entire canvas vs. tiles
Arrangement Control
- Drag to reorder: Visual thumbnail panel-drag to change sequence
- Live preview: See composition update in real-time
- Clear all: Start fresh
- Add more: Upload additional images anytime
Output Options
- Format: PNG (lossless, supports transparency) or JPEG (smaller, solid background)
- Quality: High-resolution output matching source images
- Download: Single click to save composite
How to Use It: Step-by-Step
Step 1: Upload Images
Click "Choose Files" or drag and drop onto the upload area. Select multiple images at once from your file explorer.
Supported formats: JPEG, PNG, WebP, GIF, BMP
Pro tip: Images are processed at original resolution. Start with appropriately sized images for faster processing.
Step 2: Choose Layout Mode
Select arrangement style:
- Grid: For square/rectangular compositions
- Strip: For linear sequences
- Auto: Let tool suggest based on image count
Recommendation: Grid for social media posts, strip for documentation/tutorials.
Step 3: Arrange Order
In the "Arrangement" panel, drag thumbnail images to reorder:
- Drag left/right for horizontal priority
- Sequence determines reading order (left-to-right, top-to-bottom)
Visual storytelling: Order matters. Product shots: wide → detail → use case. Tutorial: step 1 → step 2 → step 3.
Step 4: Style the Composition
Adjust visual settings:
Padding:
- 0px: Seamless collage, images touch
- 10px: Subtle separation, modern look
- 20px+: Distinct images, gallery style
Radius:
- 0px: Sharp corners, technical look
- 8px: Slightly rounded, contemporary
- 20px+: Very rounded, friendly aesthetic
Background:
- Color picker: Match brand or contrast images
- Transparent: PNG output with alpha channel
- Image upload: Branded backdrop or texture
Step 5: Generate and Export
Click "Generate Collage." Preview the final composite.
If satisfied, click "Export Image" to download. If not, adjust settings and regenerate.
Format selection:
- PNG: Use if you need transparency, or for highest quality
- JPEG: Use for smaller file size, web optimization
Real-World Use Cases
Instagram Product Showcase
Scenario: E-commerce seller showing product variants
Setup:
- 4 images: product front, back, detail, lifestyle
- Layout: 2×2 grid
- Padding: 15px
- Radius: 10px
- Background: White (#ffffff)
Result: Clean, professional Instagram post showing all angles. Higher engagement than single images.
Documentation Tutorial
Scenario: Developer creating setup guide
Setup:
- 6 screenshots: steps 1-6 of configuration
- Layout: Horizontal strip
- Padding: 5px
- Radius: 0px (sharp, technical)
- Background: Light grey (#f5f5f5)
Result: Single image showing full workflow. Perfect for README files, documentation, blog posts.
Team Page Collage
Scenario: Company website about page
Setup:
- 9 headshots: team members
- Layout: 3×3 grid
- Padding: 20px
- Radius: 50% (circular images if supported, or 100px for rounded squares)
- Background: Brand color
Result: Unified team presentation. Consistent sizing and styling. Professional appearance.
Before/After Comparison
Scenario: Fitness coach showing client results
Setup:
- 2 images: before, after
- Layout: Horizontal strip
- Padding: 0px (seamless comparison)
- Radius: 0px
- Background: Transparent
Result: Direct side-by-side comparison. No distraction from padding or borders. Impactful visual.
Event Photo Collage
Scenario: Marketing team sharing conference highlights
Setup:
- 6 photos: key moments from event
- Layout: 2×3 grid (or 3×2 depending on photo orientation)
- Padding: 10px
- Radius: 8px
- Background: Dark (#1a1a1a) for photos to pop
Result: Engaging social media post summarizing event. Single shareable image vs. multiple posts.
Pro Tips for Best Results
Consistent Aspect Ratios: Grid looks cleanest when images have similar aspect ratios. Mixing portrait and landscape creates uneven spacing.
Resolution Matching: Images of similar resolution combine cleaner. One ultra-high-res image among low-res ones looks out of place.
Padding Strategy:
- No padding: Seamless, artistic
- Small padding (5-10px): Subtle separation
- Large padding (20px+): Gallery, distinct images
Background Contrast: Dark background makes photos pop. Light background looks clean and minimal. Brand colors reinforce identity.
Radius Consistency: Match radius to your brand aesthetic. Sharp (0px) for tech/legal. Rounded (10px+) for friendly/consumer. Circular (avatar-style) for teams/people.
File Size Management: Large composites can be huge files. If file size matters (web use), export as JPEG at 90% quality. For print or editing, use PNG.
Order for Narrative: Think about reading order (left-to-right, top-to-bottom). Arrange to tell a story or show progression.
Comparison with Alternatives
| Feature | Photoshop | Canva | Mobile Apps | This Tool |
|---|---|---|---|---|
| Cost | $20+/mo | Freemium | Freemium/Ads | Free |
| Learning Curve | Steep | Moderate | Low | Low |
| Privacy | Local | Cloud | Varies | Browser-only |
| Customization | Unlimited | Good | Limited | Good |
| Watermark | No | Free tier | Usually yes | No |
| Speed | Slow setup | Fast | Fast | Fast |
| Drag Reorder | Yes | Yes | Limited | Yes |
| Output Quality | Highest | Good | Varies | High |
Limitations and Workarounds
No Templates: Doesn't have pre-designed collage templates (hearts, circles, etc.). Workaround: Use padding and radius to create clean, modern layouts. Custom shapes require design software.
No Text Overlays: Can't add captions or titles on the collage. Workaround: Generate collage, then add text in simple editor (Canva, Photopea) or use image with separate text post.
No Filters/Effects: Doesn't adjust brightness, contrast, or apply filters. Workaround: Edit images before uploading, or use bulk image processor tool first.
Canvas Size Limits: Very large composites (20+ high-res images) may hit browser memory limits. Workaround: Process in batches, or reduce input image resolution first.
No Smart Resizing: Doesn't automatically crop images to match aspect ratios. Workaround: Crop images to consistent ratios before uploading, or embrace the variety as artistic choice.
Conclusion
Stop opening Photoshop for simple grids. Stop paying for Canva exports. Stop uploading your photos to sketchy online tools.
The Image Combiner gives you professional image composition with drag-and-drop simplicity. Grids, strips, collages-exactly how you want them. Free, private, fast.
Your images tell a story. Arrange them beautifully.
Combine your images now - no signup required.